

Windows Server 2022 can run on any CubePath VPS by booting the installer from an ISO in the control panel. The Windows Server 2022 ISO that CubePath provides already includes the VirtIO drivers, so the installer sees the disk and network card without loading extra drivers. In this tutorial you will mount the ISO, install Windows from the web console, configure the static IP address the VPS needs to reach the internet, and enable Remote Desktop so you can manage the server over RDP.
Prerequisites
To follow this guide you need:
- A CubePath VPS with at least 2 vCPU, 4 GB RAM and 40 GB of disk.
- Access to the CubePath control panel.
- The public IPv4 address of the VPS, shown in the Overview tab of the VPS dashboard.
- A valid Windows Server 2022 license if you plan to use the server beyond evaluation.
- A Remote Desktop client on your computer: Remote Desktop Connection (
mstsc) on Windows, or Windows App on macOS.
WarningInstalling Windows erases the VPS disk. Back up anything you need from the current operating system before you start.
Step 1 - Mounting the Windows Server 2022 ISO
In the VPS dashboard, open the ISOs tab, search for Windows Server 2022 and click Mount. Confirm the dialog. The VPS restarts automatically with the ISO attached.
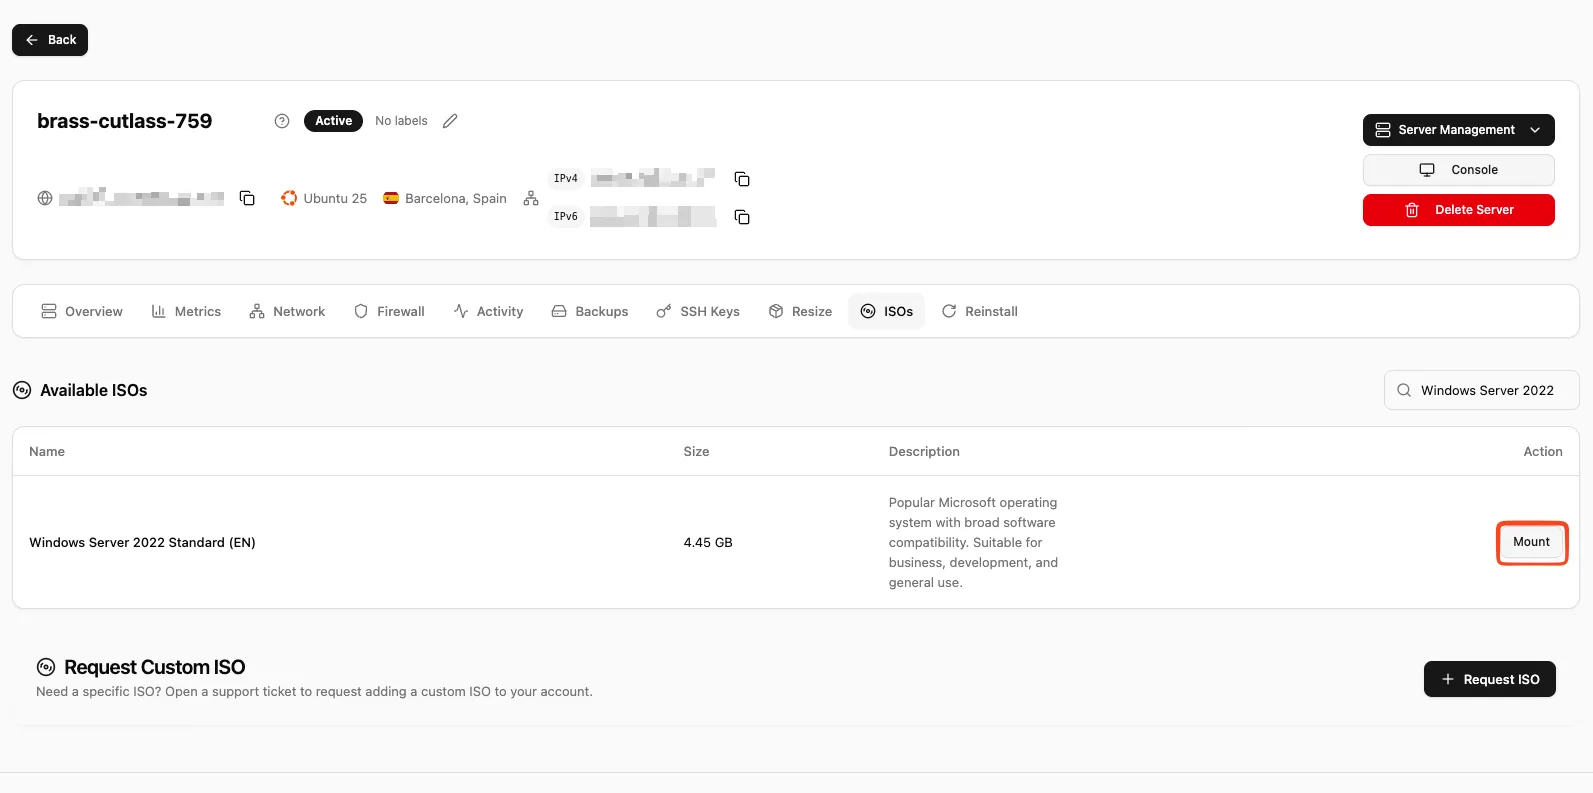
The ISO is about 5 GB, so it can take a few minutes to be copied to the server. Wait about 5 minutes and then click Restart in the VPS dashboard so the VPS boots with the full ISO available.
Step 2 - Booting the installer from the console
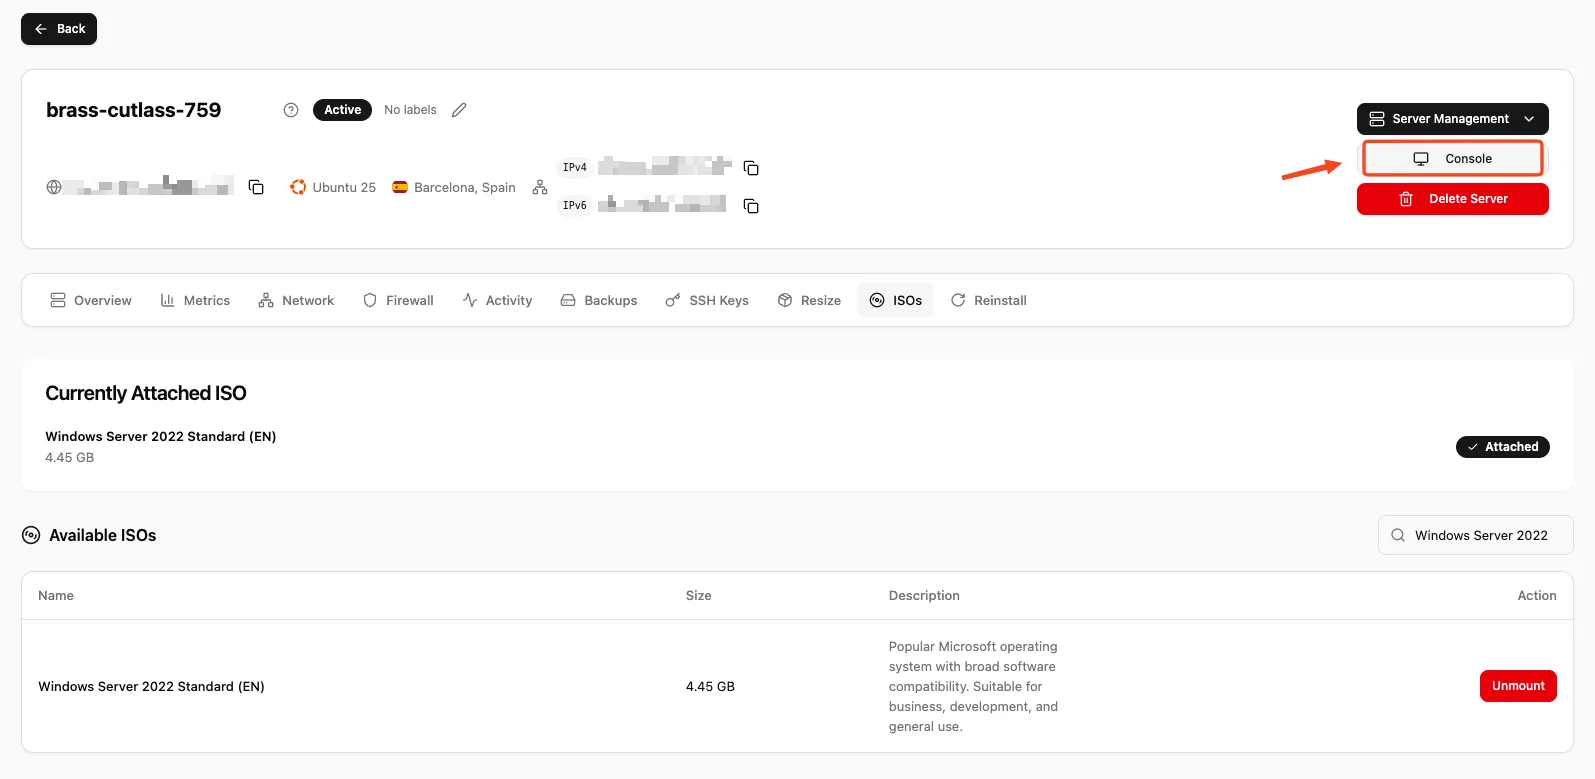
Click the Console button in the top right corner of the VPS dashboard. A new window opens showing the VPS screen.
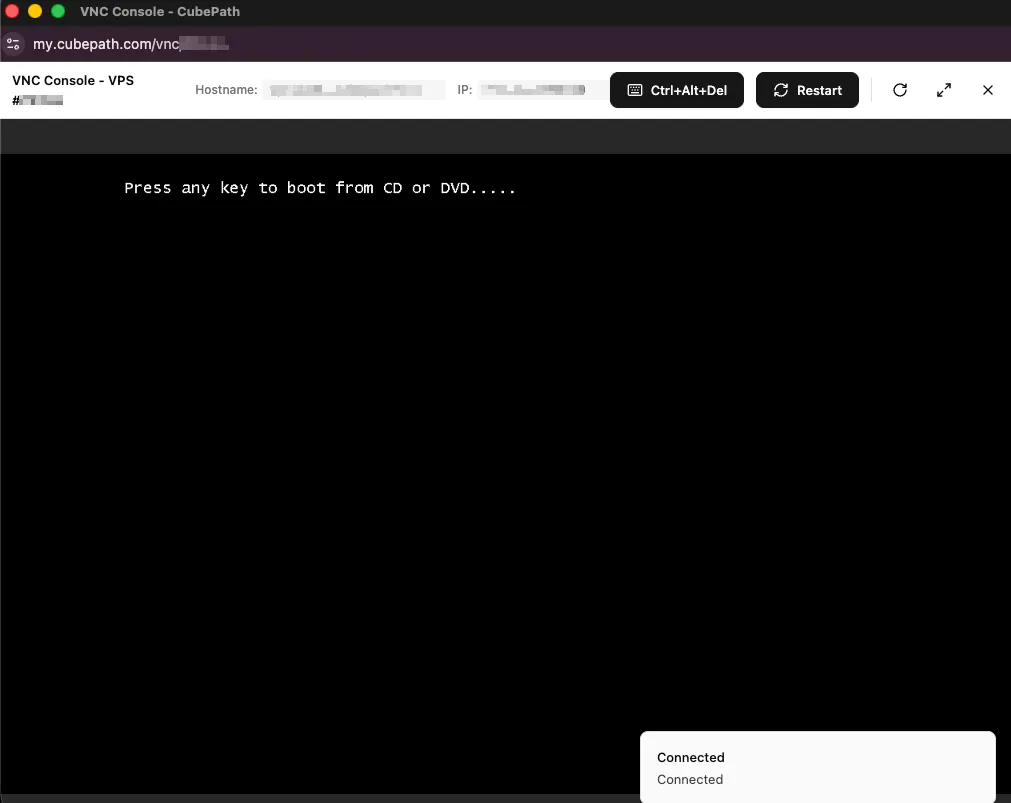
When the message "Press any key to boot from CD or DVD..." appears, click inside the console window and press any key. The prompt only waits a few seconds; if you miss it, the VPS keeps retrying and the message shows up again, so press a key the next time you see it.
You know it worked when the Windows logo and then the Windows Setup window appear.
Step 3 - Running Windows Setup
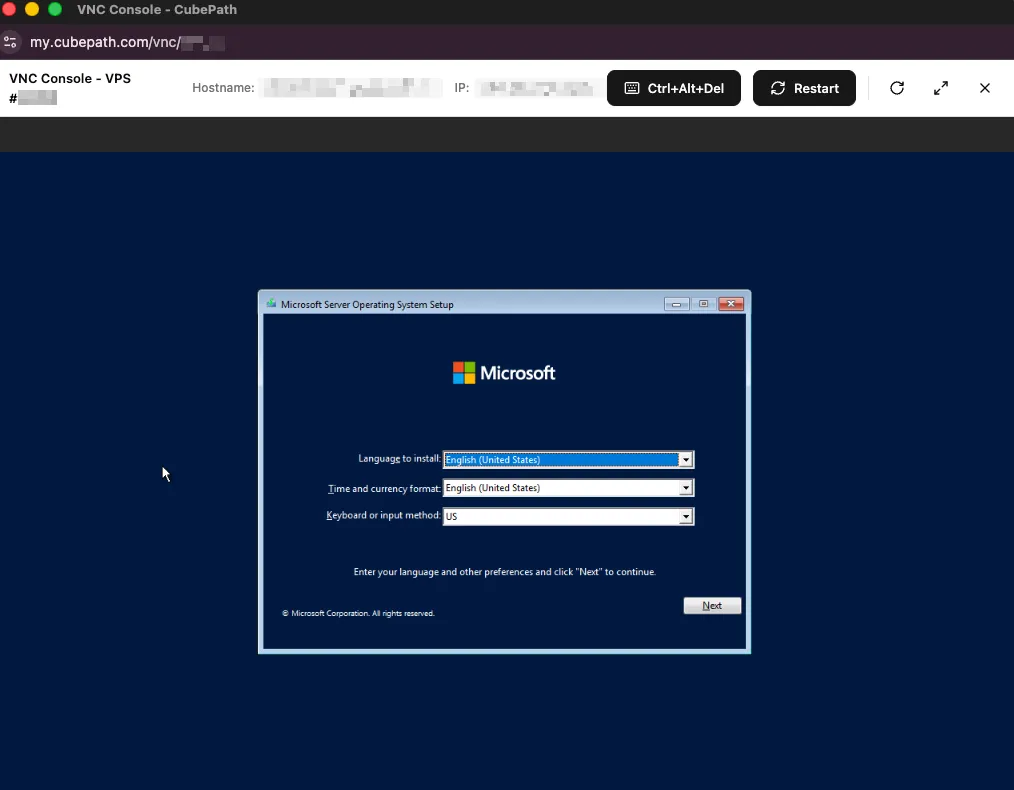
Choose your language, time and currency format and keyboard layout, then click Next. The keyboard layout matters because it is the layout the console uses when you type the Administrator password later.
Click Install now.
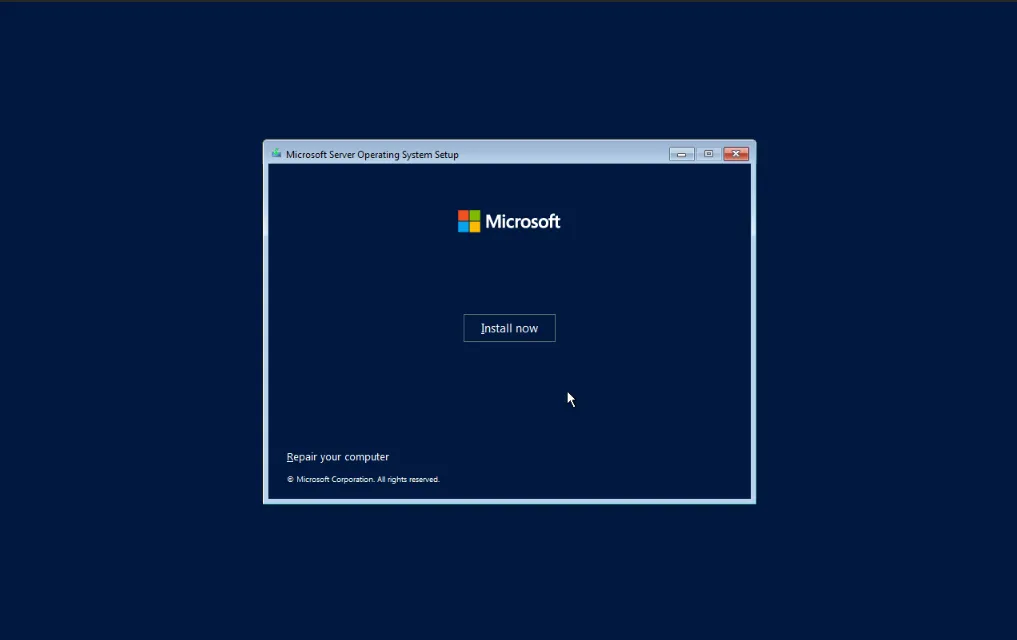
If Setup asks you to pick an operating system edition, choose one that ends in (Desktop Experience). The other editions install Server Core, which has no graphical desktop and no Server Manager window, so the network and Remote Desktop steps below would not look the same.
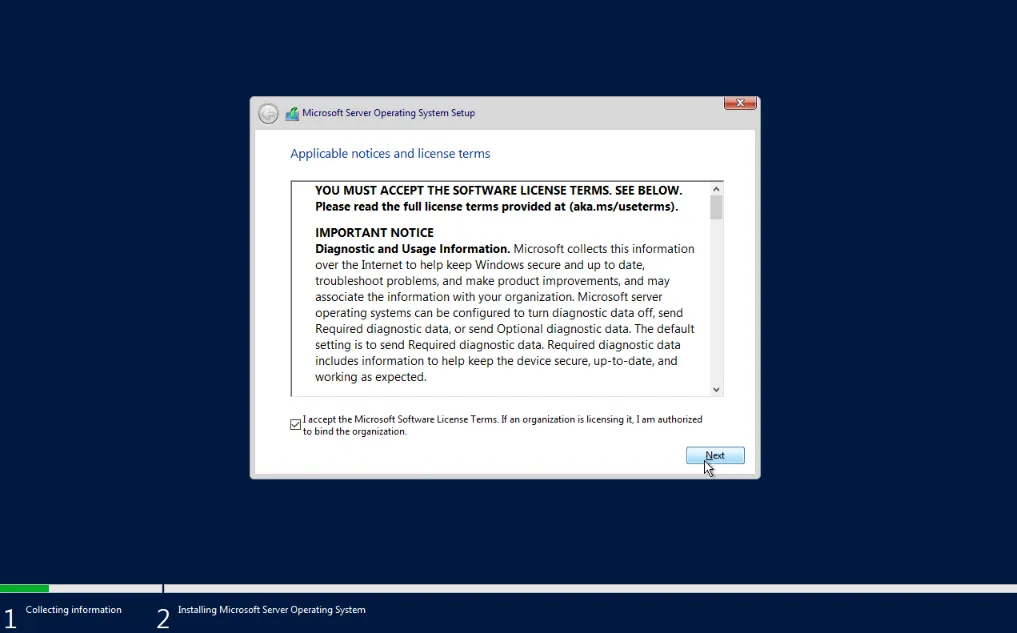
Check I accept the Microsoft Software License Terms and click Next.
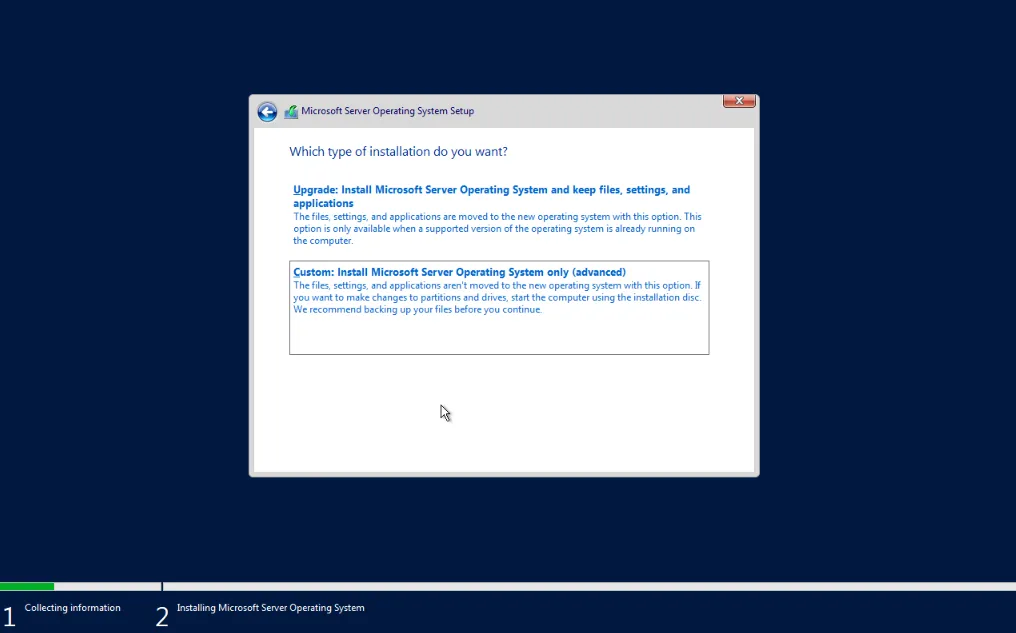
When asked for the type of installation, choose Custom: Install Microsoft Server Operating System only (advanced). The upgrade option only works from an existing Windows installation.
Step 4 - Preparing the disk
The next screen lists the partitions left by the previous operating system. For a clean installation:
- Select each partition and click Delete until only Drive 0 Unallocated Space remains.
- Select the unallocated space and click New, then Apply. Setup creates the partitions Windows needs.
- Select the largest new partition (type Primary) and click Next.
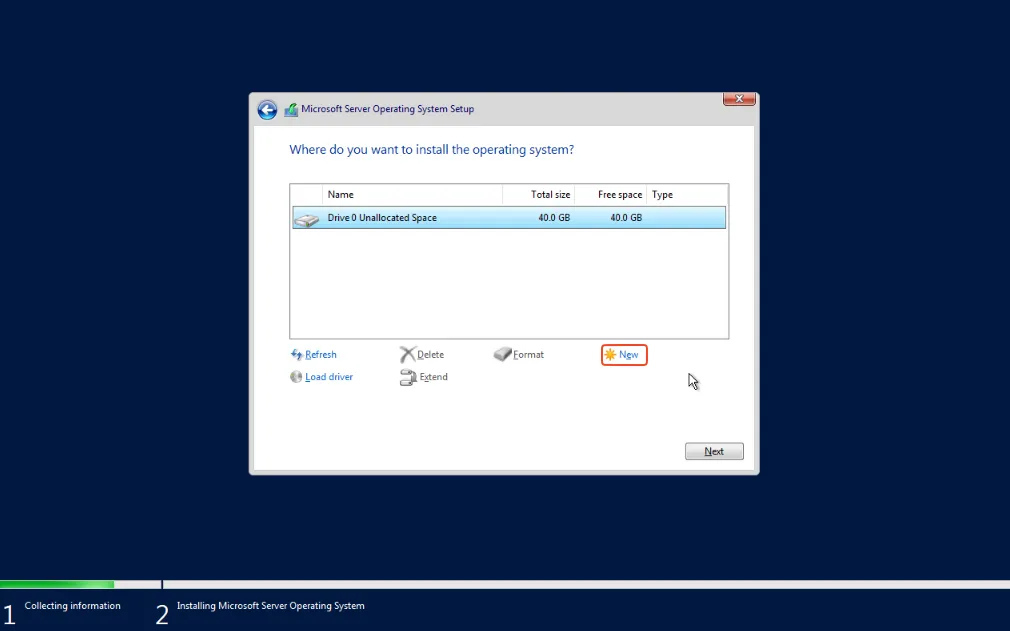
If the list is empty and shows no drive at all, the VirtIO storage driver was not loaded. Check that you mounted the Windows Server 2022 ISO from the ISOs tab and not a different image.
Step 5 - Waiting for the installation
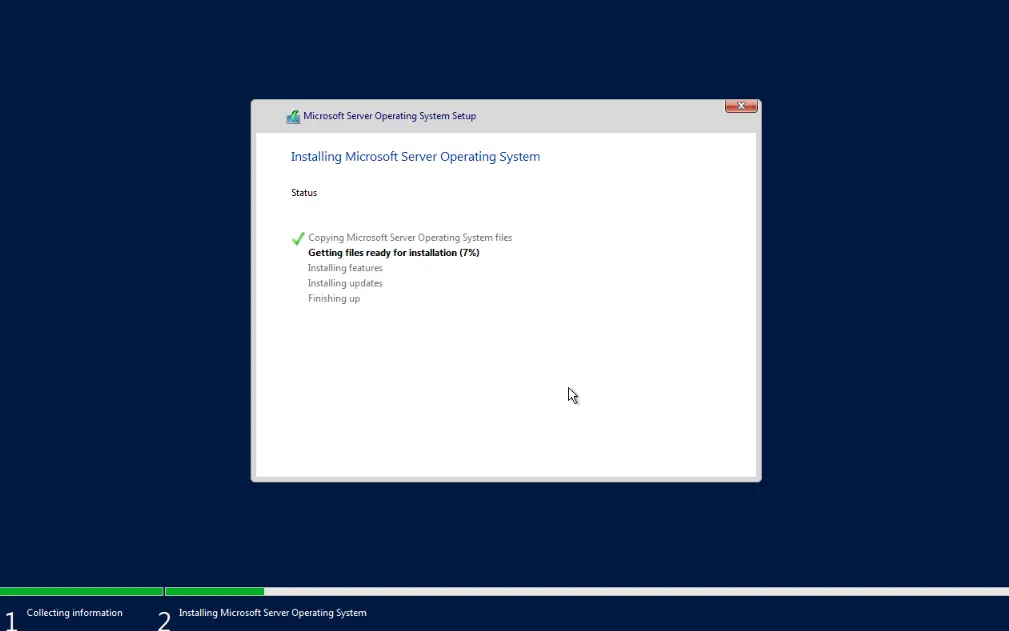
Setup copies the files and installs Windows. It takes about 10 to 15 minutes and the VPS restarts on its own one or more times. You don't need to press any key during these restarts: if you see the "Press any key to boot from CD or DVD..." message again, ignore it and let the VPS continue booting from the disk.
Step 6 - Setting the Administrator password
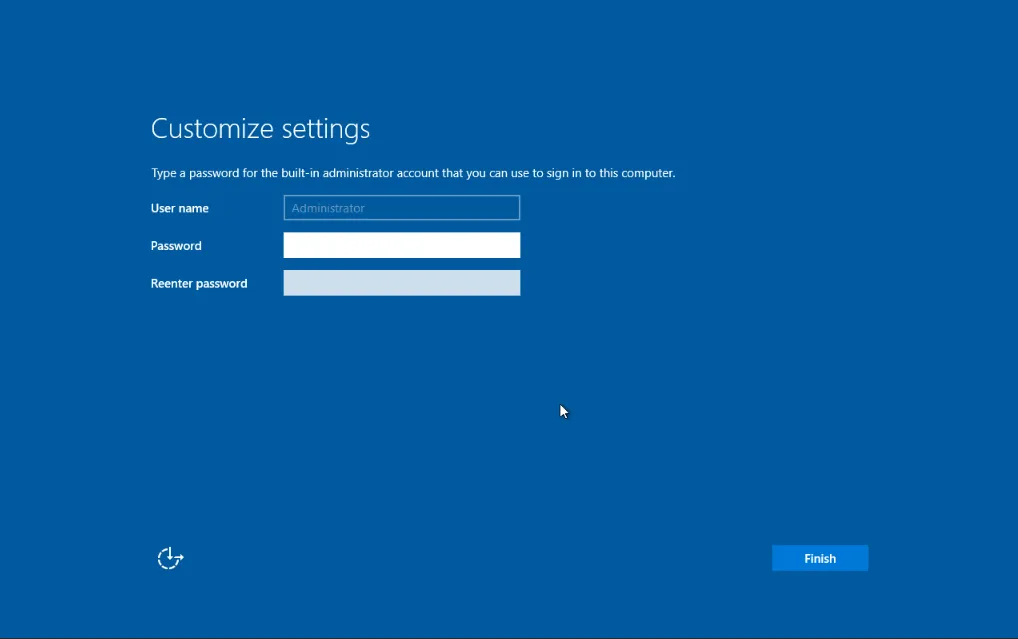
When the installation finishes, Windows asks for a password for the built-in Administrator account. Use a long, unique password: this account will be reachable over RDP from the internet once you enable Remote Desktop. Click Finish.
Step 7 - Logging in from the console
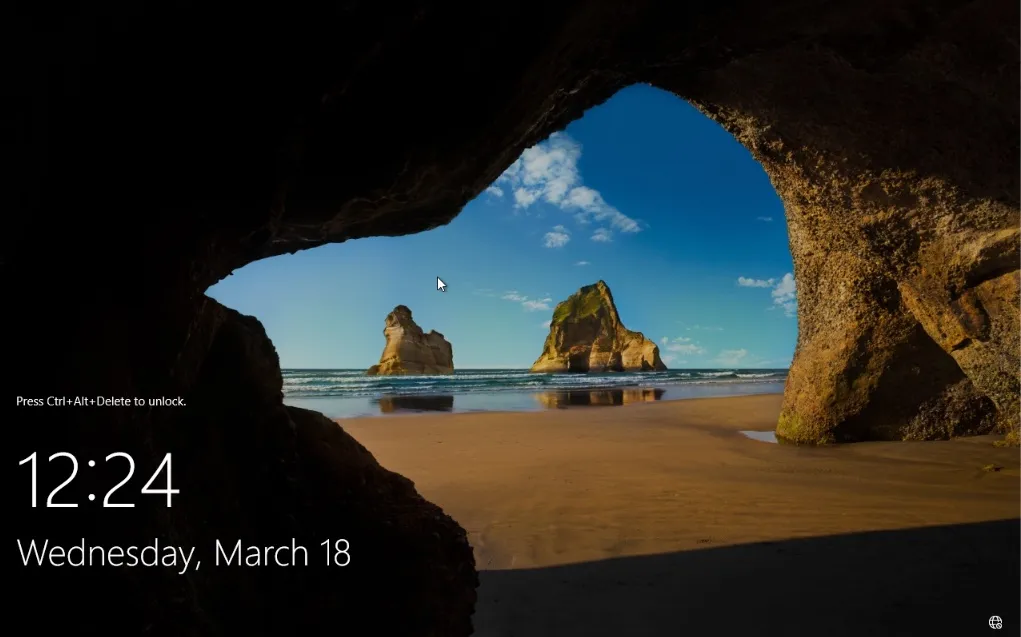
The lock screen asks for Ctrl+Alt+Del. Pressing it on your own keyboard would be caught by your computer, so click the Send CtrlAltDel button at the top of the console instead. Enter the Administrator password and press Enter.
After logging in, Server Manager opens automatically.
Step 8 - Unmounting the ISO
Go back to the ISOs tab in the VPS dashboard and click Unmount on the Windows Server 2022 ISO. This restores the normal boot order, so the VPS boots straight into Windows from now on and you won't see the "Press any key" prompt again.

Step 9 - Configuring the static IP address
Windows does not get its address automatically on the VPS, so the server has no internet access until you configure the IP by hand. You need these values:
| Field | Value |
|---|---|
| IP address | The VPS IP shown in the Overview tab |
| Subnet mask | 255.255.255.0 (prefix length 24) |
| Default gateway | The VPS IP with the last number changed to 1. For example, if the IP is 194.26.100.28, the gateway is 194.26.100.1 |
| Preferred DNS server | 1.1.1.1 |
| Alternate DNS server | 8.8.8.8 |
Option A: from the graphical interface
- Click the network icon in the bottom right of the taskbar and open Network & Internet settings.
- Click Change adapter options.
- Right-click the Ethernet adapter and select Properties.
- Select Internet Protocol Version 4 (TCP/IPv4) and click Properties.
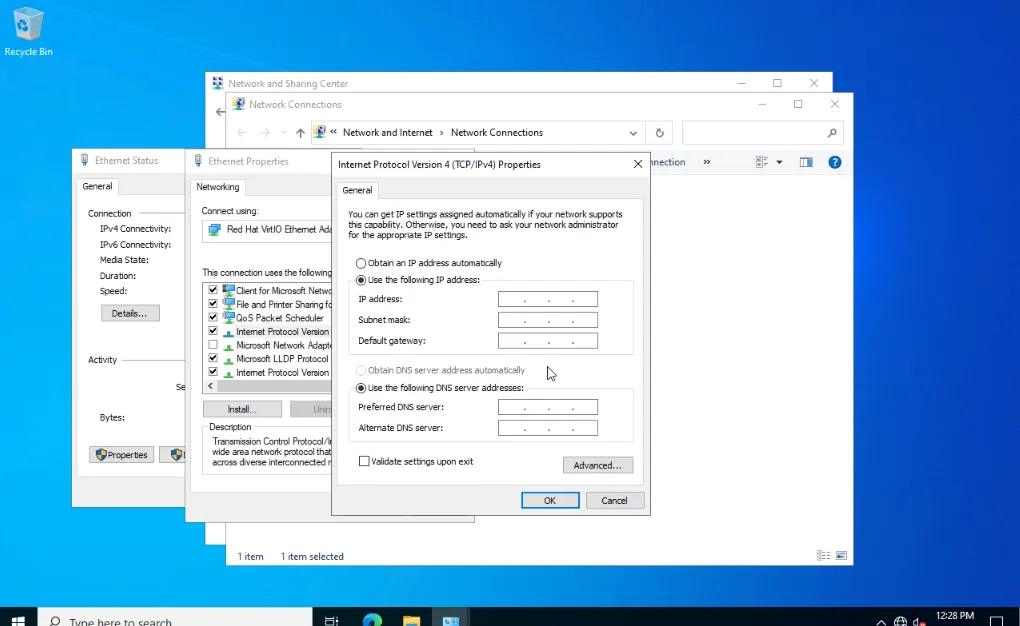
- Select Use the following IP address and Use the following DNS server addresses, and fill in the values from the table.
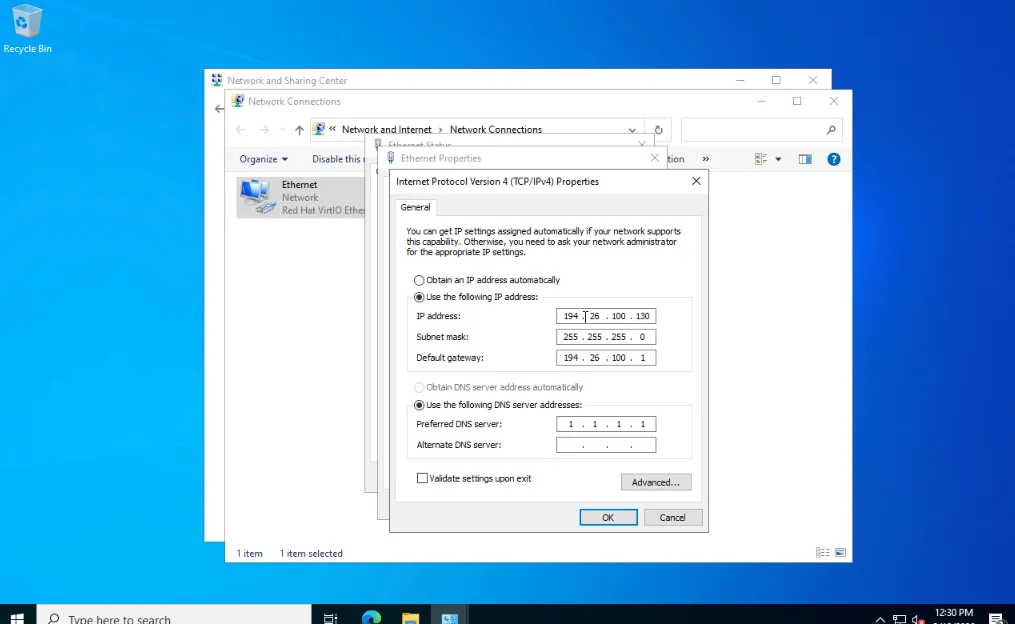
- Click OK on every open window to apply the settings.
Option B: from PowerShell
If you prefer the command line, open Windows PowerShell as Administrator (right-click the Start button and choose Windows PowerShell (Admin)). First confirm the name of the network adapter:
Get-NetAdapter
Name       InterfaceDescription                    ifIndex Status       MacAddress         LinkSpeed
----       --------------------                    ------- ------       ----------         ---------
Ethernet   Red Hat VirtIO Ethernet Adapter               6 Up           BC-24-11-XX-XX-XX    10 Gbps
Assign the address and gateway, replacing your_server_ip and your_gateway with your values:
New-NetIPAddress -InterfaceAlias "Ethernet" -IPAddress your_server_ip -PrefixLength 24 -DefaultGateway your_gateway
Set the DNS servers:
Set-DnsClientServerAddress -InterfaceAlias "Ethernet" -ServerAddresses 1.1.1.1,8.8.8.8
Verifying connectivity
Whichever option you used, check that the gateway and the internet are reachable. In PowerShell run:
Test-NetConnection cubepath.com -Port 443
ComputerName     : cubepath.com
RemoteAddress    : 104.21.x.x
RemotePort       : 443
InterfaceAlias   : Ethernet
SourceAddress    : 194.26.100.28
TcpTestSucceeded : True
TcpTestSucceeded : True means routing and DNS both work. If name resolution fails but Test-NetConnection 1.1.1.1 -Port 443 succeeds, review the DNS servers.
Step 10 - Enabling Remote Desktop
The web console is fine for the installation, but Remote Desktop is faster and supports copy and paste and a proper screen resolution.
From the graphical interface:
- In Server Manager, click Local Server.
- Click the Disabled link next to Remote Desktop.
- Select Allow remote connections to this computer. Leave Allow connections only from computers running Remote Desktop with Network Level Authentication checked.
- Click OK.
Enabling it this way also opens the Remote Desktop rules in Windows Defender Firewall. To do the same from an elevated PowerShell window instead:
Set-ItemProperty -Path 'HKLM:\System\CurrentControlSet\Control\Terminal Server' -Name fDenyTSConnections -Value 0
Enable-NetFirewallRule -DisplayGroup "Remote Desktop"
The -DisplayGroup "Remote Desktop" name applies when Windows is installed in English. Check that the service is listening on TCP port 3389:
Get-NetTCPConnection -LocalPort 3389 -State Listen
LocalAddress  LocalPort RemoteAddress RemotePort State  AppliedSetting OwningProcess
------------  --------- ------------- ---------- -----  -------------- -------------
0.0.0.0       3389      0.0.0.0       0          Listen                1120
::            3389      ::            0          Listen                1120
Step 11 - Connecting over RDP
On your computer, open Remote Desktop Connection (mstsc on Windows) or Windows App on macOS, enter the VPS IP address and log in as Administrator with the password you set in Step 6. Accept the certificate warning the first time: Windows uses a self-signed certificate for RDP by default.
Once you are connected, open Settings > Windows Update and install the pending updates before exposing any services on the server.
Troubleshooting
- The console shows the old operating system instead of the installer. The ISO was still being copied when the VPS rebooted. Wait a few more minutes, click Restart again and watch for the "Press any key" prompt.
- The installer shows no disk. You booted a different ISO. Unmount it and mount Windows Server 2022 from the ISOs tab.
- No internet after setting the IP. Compare the IP, mask and gateway against the table in Step 9. A wrong gateway is the most common mistake: it must be in the same
/24as the VPS IP and end in.1. - RDP times out. Check that Remote Desktop is enabled, that
Get-NetTCPConnection -LocalPort 3389shows a listener and that the firewall rules for the Remote Desktop group are enabled.
Conclusion
Your CubePath VPS now runs Windows Server 2022 with a static IP address and Remote Desktop enabled, and you can manage it over RDP instead of the web console. Good next steps are installing all Windows updates, creating a separate administrator account instead of using the built-in Administrator for daily work, and adding server roles such as IIS from Server Manager > Add roles and features.
If you run into a problem that isn't covered here, contact our support team.